Tuesday, November 27, 2012
Volkswagen Cyprus Cycling Tour 2013
http://www.cypruscyclingtour.com/index.php?option=com_content&view=article&id=312&Itemid=219&lang=en
Tuesday, October 2, 2012
Monday, September 24, 2012


Thursday, September 20, 2012
European Mobility Week 2012 - Larnaca Night Tour
https://maps.google.com/maps/ms?ie=UTF&msa=0&msid=213073515470785240358.0004ca113531832843c7d


https://maps.google.com/maps/ms?ie=UTF&msa=0&msid=213073515470785240358.0004ca113531832843c7d


Wednesday, September 19, 2012
Monday, August 6, 2012
BikeEd: Installing SPD Cleats
I am getting ready for my indoor spinning class and guess
what? I received a pair of Shimano SPD
Shoes. I will take this opportunity to
demonstrate how to install SPD Cleats.


Before moving into how to install SPD Cleats I want to talk
a little bit about cleats. The most
common systems are “Look” and “SPD”.
Honestly, when I purchased my road bike I had no idea what system I
should install and which one is better.
The guy in the bike shop just installed whatever he wanted without
asking any questions, so I learned to pedal with that system.
In the picture below “Look” cleat is on the left and “SPD”
is on the right. “Look” is mainly used for
road bikes, and is much bigger than the “SPD”.
SPD Cleats and pedals are usually used for indoor
cycling. They are also popular for
touring and mountain biking because many of the designed cycling shoes are also
comfortable for walking around.
When it comes to operation both are almost the same when it
comes to clipping in and out of the pedals. To start pedaling you engage the
pedal by hooking the front of the cleat in the front of the pedal, and then you
press down with your heel to make the cleat clip in to the pedal. To remove
your shoe from the pedal, you push your heel to the side, rotating your entire
foot away from the bike, which causes the pedal clamp to disengage from the
cleat and unclip.
Now since I received SPD Shoes as a present I needed to
learn more about the shoes and I had to go out to purchase a new SPD Cleat Set
(SM-SH56). I found out that installing
your SPD Cleats was pretty much easy.
What you will need is a SPD compatible shoe, SPD cleats and a hex key.
This is what I bought:
Both cleats are the same, and you can put them either left
or right, but they have a front and a back.
The side with the teeth on the cleat has to go against the bottom of the
shoe, to bite the sole of the show so the cleat will not move around. The washer goes on top of the cleat, between
the cleat and screw, so you can adjust the cleat as you tighten the screw.

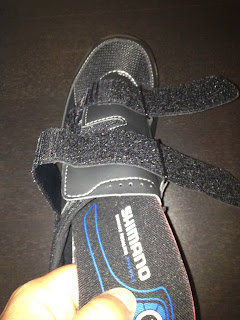
Step 1: Remove the
inner sole from your shoe so you can adjust/insert the metal plate. Most of the times the metal plates come with
the shoes. Put your hand inside the shoe
and adjust the metal plate where it is most comfortable for your
pedalling. Make sure that the smooth
part of the plate looks towards the inner sole so it will not hurt your feet.


Step 2: Screw the
cleats on the metal plates.
Before you start screwing the cleat it is recommended that
you crease the screws a little bit so it will be easier at a later stage when
you need to adjust or replace the cleat.
Put your cleats on
the shoe, where you feel more comfortable and make sure that the “toothy” side
of the cleat is against the plastic, and the pointy “nose” of the cleat is
towards the toe of the shoe. Put the washer on top of the cleat in the recessed
space, and put the screws in, but don’t tighten anything yet. Check the position
of the cleat. At this point you can move the cleat around so that it is where
you want it. When you get the right
position you can tighten the screws.


Step 3:
Now get out and ride
Just a note on SPD Cleats, there are two types. If you noticed there is an “M” on the cleats
which mean multidirectional motion of the heel to release the cleat. You can
move the heel to the side, or up and to the side, and the pedal will release. The second type of cleats is the one without
the “M”. Those unclip by turning the
heel of your shoe to the side, which is the more traditional way.
Tuesday, May 15, 2012

Monday, March 5, 2012


Thursday, February 9, 2012
Spicy Broccoli Soup

Tuesday, February 7, 2012
Subscribe to:
Posts (Atom)